Friday, December 17, 2010
Fish Platter
A long time ago i cut the Fish bowl i am sharing here
For 12mm deep Pocket operation I used 1" Barley Twist Tool, for Profile cut i used 6.5mm endmill and V-carving was done by 12.5mm 90 degree V-bit...
The Platter Length is 610mm and width 250mm and the thickness 16mm.... TOTAL TIME 45Minutes with toolchange...
Thursday, September 23, 2010
Tuesday, September 21, 2010
Monday, September 20, 2010
The internal of the Laser Scanner control Box
This time i am showing you the inside of the laser scanner control box... The heart of the controller unit is Arduino which is programmable microcontroller... Programming of this controller is a fun project and learn a lot...
The wiring as you see in the picture was done with great care and now i have some electronics knowledge that is used to complete this project... This hardware was completely done by me along with the microcontroller programming...
I have many options available in the hardware... The controller box is supplied with Laptop power supply , Arduino controll the Laser, stepper motor and texture light.. I also added some buttons to reverse and forward the stepper motors.. A plug is provided for installation of limit switch...
In future i will add some more functionality in this setup as i have lot of place to add some more buttons, however the wiring will be really very tricky then....
Sunday, September 19, 2010
Spray Bottle Scan with Improved Hardware
Attached you can see the scan of spray bottle .. Total 9 scans , each scan cycle took 2minutes.. Approximate height of the spray bottle is 250mm and 80mm in diameter...
The alignment and stitching was a difficult part due to symmetry in the model.. However, i learn a lot in stitching the scans... The results are attached...
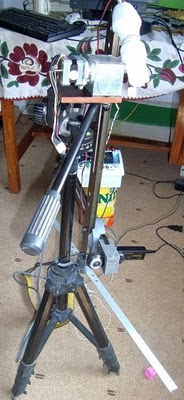
Improved Laser Scanner Setup
It took a lot of time and patience to make the hardware of my laser scanner setup in such a way that:
1- It can easily perform the scanning without calibration panel.
2- It can be easily disassembled and assembled in new location.
3-Compact in size for transportation
4- Aesthetically look beautiful
5- Electronics have all the control features
6- The complete setup is light weight.
7- Accurate and reliable
After, considering all above and lot more i was able to DIY the hardware and made the first test scan.. Attached are the pictures of my improved Hardware..
Saturday, April 17, 2010
Embroidery Gcode Generator V2.4.4
Recently, I have made drastic changes in embroidery software... These changes were necessary to make optimum Gcode for embroidery work...
Previously, I have made the Gcode that took 30minutes, now the same Gcode is effiecient and takes 16minutes on the embroidery machine... I have added functionalities to move both hoop as well as Needle when the the needle is above the cloth..this saves 40% of embroidery time... I have also added 'Machine Setting' dialogue for the users that will help them for setting Z-axis (sewing Wheel) values in Mach3 software..
You can see the attached figures by clicking on them..
Tuesday, April 6, 2010
First Embroidery Test
Hi all,I want to share the picture of embroidery artwork RENE has done on his ordinary sewing machine using my Embroidery Gcode Generator Software... He did a great job on it and as i am busy in my Fertilizer Plant Turnaround and doing some hectic work of maintenance, these results literally freshen my mind...
I suggested Rene to do following improvements to get positive results
1- Tighten the clothe very well on the Hoop.
2- The white thread on the bobbin emerging in picture shows that Bobbin thread needs more tention... 3- He should apply some embroider paper behind the cloth..This will give drastic improvement in embroidery..
I am adding RENE work here... I hope you all will like what we can do..Further details can be seen in following thread...
http://www.cnczone.com/forums/showth...=57404&page=23
I am adding RENE work here... I hope you all will like what we can do..Further details can be seen in following thread...
http://www.cnczone.com/forums/showth...=57404&page=23
PS:Just note he is using Router and sewing machine to get this result... This is just the begining... and we have to see marvels in future.. We break into the core of high end commercial machines manufacturer... ;)
Sunday, February 28, 2010
Embroidery Gcode Generator V2.4 Beta
In this Version I made following minor changes:
1- On the Top of Gcode, added Total No. of Gcode Lines
2- Made the drawing screen background Colour Black
3- On the bottom added the color information/usage in 'Same Colored Text'
4- Now You can Animate with Cross-hair showing the exact Position of stitch.
5- You can Scroll through the Gcode and Animation Cross hair will update its Position.
Attached is the Program Executable file along with some DST files.. Still need to put the Code in Menu and SaveGcode button is not functional for the time being.. I will try to make it complete and will place here...Just you can check and give me feedback for improving it.. You can unpack the zip and run the executable within the folder if it not run then The Program requires DOTNET framework or Visual Basic runtime files (Can be downloaded free from internet)
The embroidery beta release can be downloaded from following link:
http://www.cnczone.com/forums/showthread.php?t=57404&page=17
Monday, February 22, 2010
Sunday, February 14, 2010
Improvement in Embroidery Software
A couple of days ago, while testing the embroidery machine, I lost one of my controller card and this was due to small strand of wire that short-circuit the lower-side of PCB board and some FET's blown away... This was a great setback to me because i just checked the motors and want to start some embroidery work.... SAD day..:(
As my controller card is under etching, so i just started improvements in the embroidery software... I added Stitch Marks (Needle points) in the Simulation.. Added some new colours and Optimized the Gcode generation algorithm...
I hope very soon i will able to show some great embroidery work ;)...
EDIT:
Added some more functionalities like showing Colors and new MenuBar.. Now you can see the number of colors 'in-orders' and simulation of each color...
Improvement in Embroidery Software
I have blown one of my controller card of Embroidery Machine.. and it was totally my fault... This was because of my bad housekeeping Habit ;)... A strand of wire short circuit the FET's and i have lost my modular card in a second...
So again this weekend i was not able to run my machine :(... I tested the handwheel driving stepper motor but the speed the drawback is that the speed and response was not good... I have to work more on the ways to get high SPM ( Stitches Per Minutes)... Recently i worked on my embroidery software and made some enhancements... I added the needle Marks in simulation and the Gcode was optimised.. New colours added and did some blushing on the main screen...
Tuesday, January 26, 2010
My DIY CNC Embroidery Machine
Last year My wife stressed me to make a DIY embroidery machine with bigger Hoop and that can do all type of stitch work... .. It was a challenge to me... .. All types of stitches!!!!.. I asked her What do you mean by All type of stitches???...
She replied " I need a machine that can compete with modern industrial Machines"... Hmmm..... and the story Begins...and I left Woodwork and tried to look like a embroider..From that day and now, i have a lot of knowledge about embroidery machines and working principal...
I researched on the machines and found that The Following are the few File Formates that Embroidery machine uses..
Brother *.pes
Tajima *.dst
Viking *.hus
Melco *.exp etc
From that day, After a long long time i was able to make a software that can drive my CNC Embroidery Machine with all types of stitches that industrial machines can do. Basically, my intent was to convert low-cost manual sewing machine into embroidery machine that can compete with industrial machines. For this I have to write a software that can convert the DST file into machine readable file.. The DST file is a TAJIMA file format and it is complex binary coded...It was hard for me make a software that can read the file and simulate the design and make the Gcode..Previous experience in visual basic Programming made it possible to write a customised program...
Following is the software that i have written in Visual BAsic Language.. With my this software machine will able to do Straight stitch, Cross-stitch, Zig-zag stitch, Satin stitch, Tatami stitch,chain stitch, Motif-run stitch, triple run stitch, Contour stitch, Perpendicular coil stitch and all types of Alphabets and Pictures...
For hardware drawings are completed and 80% will be assembled within this week end. The functionality of the machine will be..
1- The Large Hoop working area ( 9" x 20")
2- For every new colour in design machine will stop with needle upward condition for colour change.
3- A bulb will lit up so that thread can be easily changed
4- Automatic thread cutting
5-If thread broke machine will stop
further functionalities can be added in future.
Subscribe to:
Posts (Atom)